HAIML-9000
The idea
During my second year at AIML lab, my colleagues and I have decided to create an original gift for the head of the group: Kristian Kersting. As Kristian is a lot concerned and involved with the future of AI, and its ethical dimension, we decided to create an allegory as present.
One famous AI figure of early SF (dystopic) movies is HAL-9000, the AI of 2001, A Space Odyssey. In the movie, HAL is an AI, considered as a dependable member of the crew, maintaining ship functions and engaging genially with his human crew-mates on an equal footing. However, at some point, HAL tries to kill its human colleagues, and tell Dave, that wants to get back in the main spaceship and ask HAL to open the door: “I am sorry Dave, I am afraid I can’t do that“, and “This mission is too important for me to allow you to jeopardize it“.
Our idea was thus to create a replica of HAL, and personalize it a bit. It would become the second robot of our lab, after Alfie.
We were not the first who wanted to create and HAL replica, many people have already done so and some have even shared their work online. Notably, we have been able to find this version on thingiverse, that is an accurate replica of the original character. We based our work on this version.
Most of the parts were 3D printed, as in the original, and potentially then painted or post-processed. The only electronics that this baseline uses is the LED. But we wanted to add:
- A speaker that would tell one of the cult catchphrases of above
- A motion sensor that would detect movement (triggering the speaker)
- An on-off switch, to avoid removing the batteries/disconnecting the power bank
- An Arduino to coordinate all of this.
This required programming the board. Fortunately, there are tons of tutorials on the web that help to do so, but I haven’t been able to find one which describes a motion sensor that triggers a sound and some light pattern.
I’m explaining the caveat I have had with this project, and I am sharing the code, for people who would like to reproduce.

The material
I have 3D modified and 3D printed most of the parts. The original design uses a painted PCB for the lower part, but I didn’t have one with the correct size. 3D printing such a board, with small holes is quite tedious, as the first layer is made of holes that are likely to detach from the printing bed. As solution, I printed a completely filled rectangle as first layer (0.2mm) and drilled the holes with a school compass to drill the holes. This is time-consuming, but allowed me to personalize the part (KK are the initials of Kristian Kersting) !

I used an APDS-9960 as motion sensor, an Adafruit Mono Enclosed as speaker, an Arduino Nano as board, and simple LED and on/off switch. I also bought a small 5000 mAh Powerbank (as it is simpler to use and connect to the board than batteries).
The lenses that compose the eye with the LED were the most complicated part. The original idea was to cut the out of transparent Christmas trees ball ornaments. This is doable with a rotating tool (a Dremel) that can also be used to polish the edges.
However, the result is not perfect and above all gluing it with instant glue cause the lens to turn white. I then tried to use a glue made to preserve transparency, but the part did not stick together. I finally decided to use hot glue. However, hot glue tend to dry fast and thus does not let one place it all around without drying (unless you use a hot-pistol/hair dryer, which I did). Moreover, the dry glue is not invisible. A potential improvement for the design would consider plastic parts that cover the lens.

The wiring
One can deduce the wiring from the code that I’ll provide hereafter, but here are some photos that shows the enclosure parts had to be modified, and how I had everything maintained in place using mainly hot glue.
The code
One problem of this project is that the Arduino aren’t able to decode sound by default. An alternative is to convert the sound into a frequency table and have the program send these raw frequencies to the speaker. This explains why the sound is encoded as a big vector. Another problem is the limited size of the Arduino memory, which enforced me to remove a good part of the sound (notably the pause in the sentence) and replace it with a pause in the code. I thus had to separate the sound vector into two sound vectors.
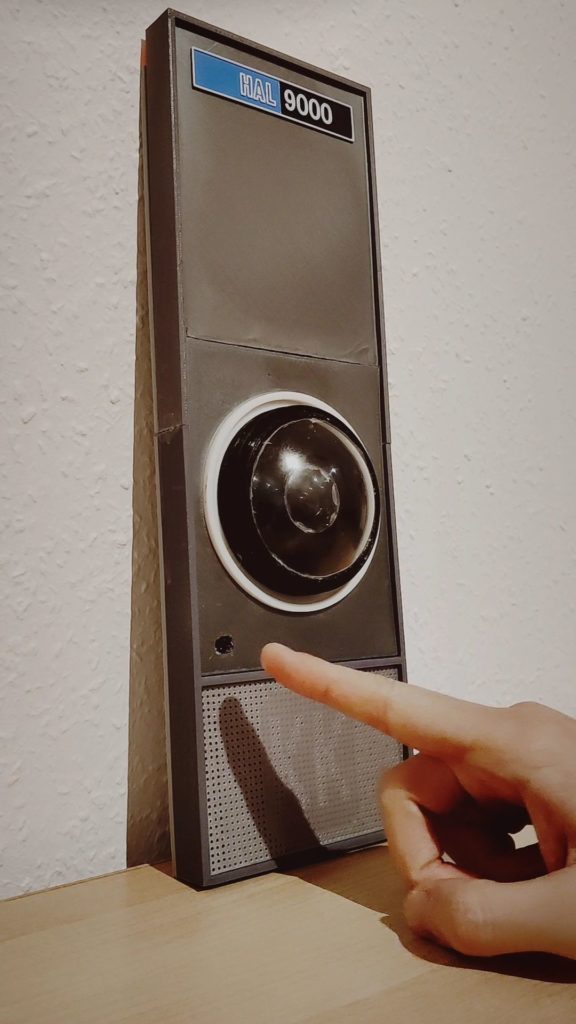
The result
This 3D printing, building, wiring and coding journey led us to the following result, which I finally like a lot ! More importantly, Kristian also liked it a lot, and our HAIML-9000 is now part of the AIML Lab of TU Darmstadt !
HAIML has become an official member of AIML Lab, you can find his corresponding page here !